Home
Usage
This project contains a SoftMotion device driver that allows to control a stepper motor with a Raspberry Pi using the local GPIOs of the Pi and dedicated (cost efficient) stepper driver hardware often applied in 3D printers.
The driver works exclusively with the CODESYS Control Raspberry Pi SL and CODESYS SoftMotion.
The device is configurable, so it is possible to use different motors and to choose the GPIO-Pins freely.
Hardware
The driver works with all Raspberry models. However, the performance (esp. jitter) of the Raspberry determines the precision and performance of the motor movement. The best result can be achieved with the multi core variant of the runtime, assigning each motor device to an exclusive core.
The device driver is designed to operate with two types of devices:
1. H-bridge devices (like L298N), that amplify the incoming signal and hence allow to control 2-phase steppers directly with 4 outputs of the Raspberry Pi.
2. Puls/Dir stepper driver devices (like A4988, DRV8880) that are controlled with at least two digital outputs that carry the direction and the frequency of steps (speed)).
Wiring

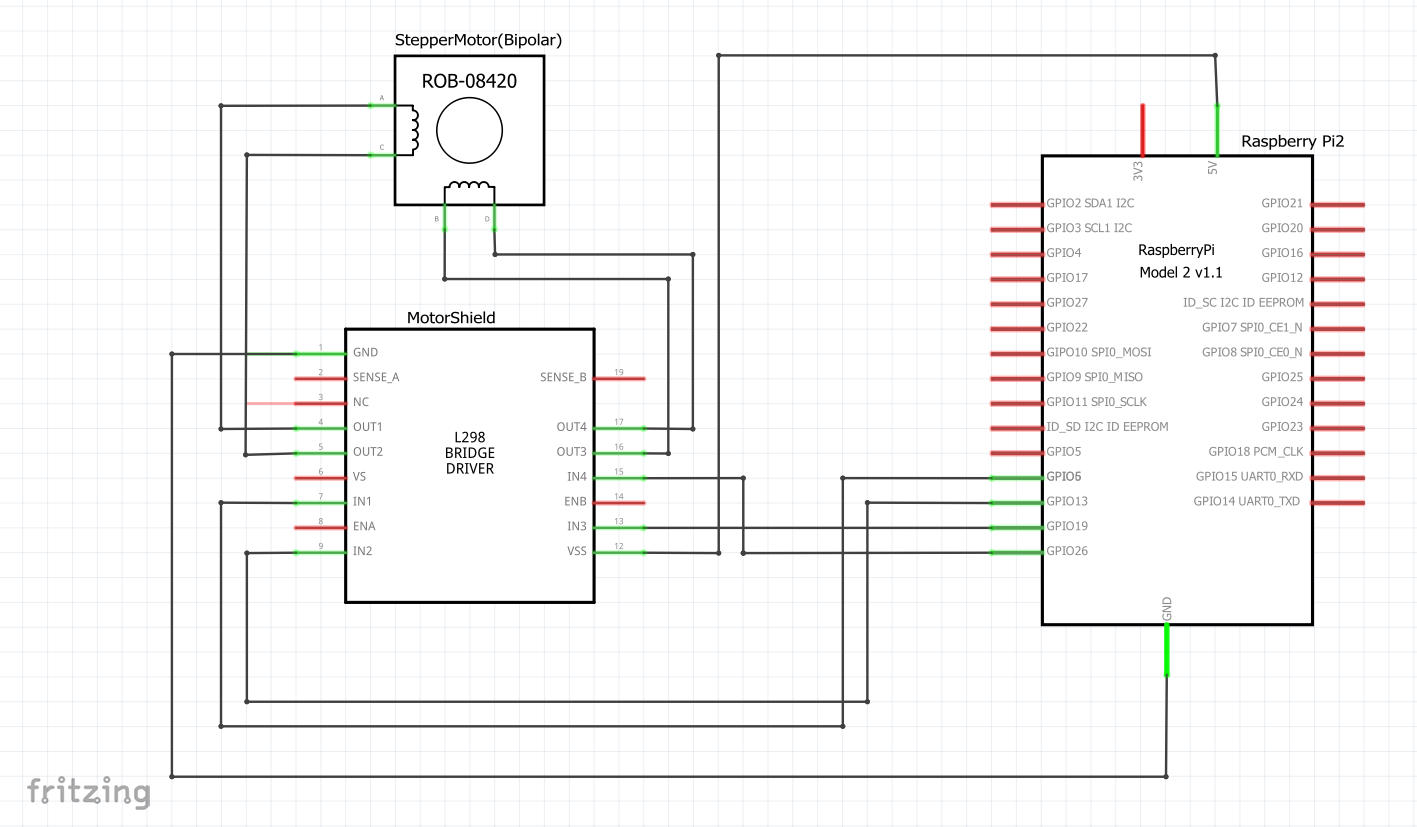
The above image shows the wiring for a L298N circuit.
The GPIO-Pins of the Raspi are connected to the Input pins of the motor driver device and the motor to the output pins of the driver. The supply voltage for the motor and the driver are connected to the driver.
It is strongly recommended to keep the circuit of the control signals and the power circuit for the motors independent.
Take a close look that no wires are mixed up and everything is connected correctly. Otherwise the motor will not turn correctly!
Add Device
You can add the device to your project the same way as other SoftMotion devices.
With a right click on the „SoftMotion General Axis Pool“ you open the menu „Add device“. The „SM_Drive_RaspiStepper_Direct“ (designed to use H-bridge based devices, see above) and the "SM_Drive_RaspiStepper_PulsDir" can be found in the category „Softmotion drives“ and „position controled drives“, which you can add now by clicking „Add Device“.
Configure Device
With a double click on the device in the device tree the editor for the configuration opens. The motor specific parameters like number of motor increments per turn (many models have 200 steps/turn), the velocity unit or the maximum velocity can be set as in other SoftMotion devices.
To see the specific parameters first make sure that the option "Show generic device configuration views" in Tools->Options->Device Editor is enabled.
Then you can edit the specific parameters in the tab "SM_Drive_RaspiStepper: Parameters" in the folder "AXIS_REF:Motorsettings". These are:
For model SM_Drive_RaspiStepper_Direct:
A, A-, B, B-: The GPIO pin numbers to which the H-bridge that controls the corresponding motor wires are connected.
MotorPowerTime ]0..1]: fraction of the cycle, where the outputs are set (and where power runs through the motor). This parameter can be used to influence the power of the motor.
HalfStep: activate (TRUE)/deactivate (FALSE) half setp mode
InvertDirection: determines the direction
For model SM_Drive_RaspiStepper_PulsDir:
Puls: GPIO pin number that carries the puls signal.
Dir: GPIO pin number that carries the direction signal.
Enable: GPIO pin number that is set, when the axis is enabled (with MC_Power) (0: not used)
Disable: GPIO pin number that is set, when the axis is disabled (inverse to Enable) (0: not used)
Common parameters:
MaxFrequency: maxmimum frequency (steps per second) that the motor can follow. 0: unlimited
TaskGroup: contains the name of the task group in which the IEC task that directly controls the outputs is placed. This can be used to determine the CPU core that executes the control. It is recommended to distribute the motor drivers on the cores.
Implementation
To call up the motor in the project, a program must be added to the application as a "POU". There you can use applicable CODESYS SoftMotion function blocks like MC_Power or MC_MoveVelocity. Or you create an instance of "SMC_StartupDrive" (that contains many basic function blocks) and assign this instance to the SoftMotion axis.
PROGRAM PLC_PRG
VAR
    sud: SMC_StartupDrive;
END_VAR
-----
Sud(Axis:=SM_Drive_RaspiStepper);
The motor can now get controlled like other SoftMotion devices with the SoftMotion-FBs.
Limitations
As the SoftMotion device needs an exclusive GPIO access, it is not possible to use the other GPIOs in parallel in the same project.
The minimum cycle time of a IEC task and the jitter, with which it is executed, determine the quality of the signal. Also the motor control device type strongly influences the quality. In our tests we have made much better experiences with DRV8880 and A4988 (that do an internal control of the current) compared to the L298N (that simply enables the current and doesn't do any closed loop power control).
How it works
Every SoftMotion axis creates a own task, which runs in the background typically with the frequency corresponding to the desired motor speed. This task calls the function block "StepperControl", where the output signals are set corresponding to the actual position of the motor.
Example and test
We have testes this driver on a Raspberry Pi 3 B+, with CODESYS Control for raspberry SL MC 4.0.0.0.
We have connected the controller to 3 different stepper drivers (L298N, A4988, DRV8880) that were assigned to different task groups.
The example project is provided, too.
Project Members:
- Hilmar Panzer (admin)
- Ingo (admin)
- gseidel (admin)
- jeremias (admin)
- tk096 (admin)
- tschroeder (admin)